Day 6

  • Structural Directives
  • Forms
  • Form Validation (with and without Material)
    
                    < div *ngIf="hero" class="name">{{user.name}}< /div>
                    
  • What's this * thingy?
  • "The asterisk is "syntactic sugar" for something a bit more complicated. Internally, Angular translates the *ngIf attribute into a element, wrapped around the host element..."
    -Angular Docs
  • Let's say we wanted to completely remove an element from the DOM. You may want to hide certain information from certain types of users (admin vs. user). Or maybe if the user hasn't paid their subscription you want to make sure they can't see certain values.
  • In order to do this, you need two things:
    • A value to control the *ngIf
    • An *ngIf statement
  • Let's take a look at our nav.component.html file. ngIf
  • Those *ngIf statements are controlling whether the anchor tags get rendered into the DOM or not.
  • What is the control value?
  • What if we want to run a function to determine our ngIf statement? We can but...
    1. The function must return a boolean
    2. The function will only run when Angular runs the lifecycle hooks
    3. This isn't the optimal way to use ngIf because of the lifecycle limitations
  • What if we want an "else" after that "if"?
  • 
                      < div *ngIf="user.lastName; else noLastName">
                        You're in the last name club Mr./Mrs.{{ user.lastName }}!
                      < / div>
                      < ng-template #noLastName>
                        Sorry, you don't have a name...
                      < / ng-template>
                     
  • "BUT TEACH!" you say, "What if there are more than two options?!"
  • Enter [ngSwitch]
  • As with a vanilla JS switch statement, you need:
    1. A condition to evaluate
    2. Cases to check for
    3. A default case
    4. 
                          < div [ngSwitch]="product.price" >
                            < p *ngSwitchCase="12.99">Expensive!!< /p>
                            < p *ngSwitchCase="9.99">Pricey.< /p>
                            < p *ngSwitchCase="2.99">Darn Cheap!< /p>
                            < p *ngSwitchDefault>Either really expensive or TOO CHEAP!< /p>
                          < /div>
                        
  • How can we include conditional classes and styles?
  • [ngClass], of course!
  • Can we use a TERNARY???
  • Yep....
  • 
                       < p [ngClass]="user.lastName ? 'blue-text' : 'red-text' ">{{user.firstName}}< /p>
                     
  • Just like with vanilla JS, you have to have these two classes defined in your CSS for it to work.
  • If we look at our users.component.html, we see that we are displaying a list of users. But how are we referring to that list? How is each member being pulled out of the array of users?
  • Angular Material is masking a very basic directive: *ngFor
    
                          [dataSource]="users"
                        
  • This is Material's way of using *ngFor. In "plain" Angular, it would look like this:
    
                         < li *ngFor="let user of users">{{user.firstName}}< /li>
                       
  • Using the same logic as a for loop, for as many users as you have, you create a single li that has the user's first name (in this case.)
  • This is GREAT for iterating over arrays of data.

Try it out!

  1. Create a new component named Products using the Angular CLI.
  2. Add a Products service and create a GET route for /products Hint: follow the pattern in your users.component.ts for accessing those products
  3. After you are sure you have the data (check in your console) use *ngFor to repeat over the data in your products.component.html
  4. Display the products' names, descriptions, and prices.
  • Two ways to do Forms in Angular:
    1. Template Driven
      1. Import the FormsModule into app.module.ts and add it to your imports to use Angular Template Driven Forms
        
                                //In app.module.ts 
        
                                import { FormsModule }   from '@angular/forms';
                                //...
                                @NgModule({
                                  imports: [
                                    BrowserModule,
                                    FormsModule
                                  ],
                                  /...
                              
      2. Add a form to your html file, and include an ngForm directive (automatically imported by Angular)
        
                                < form #loginForm="ngForm">
                                //...
                                < /form>
                            
      3. Add [(ngModel)] directive and a Template reference variable to your inputs inside your form
        
                    ...
                    < input type="email" name="email" [(ngModel)]="user.email" #email="ngModel"/>
                              
        Name attribute is required for Angular Template driven forms to work.
      4. Angular adds special validation classes

        template Forms Chart

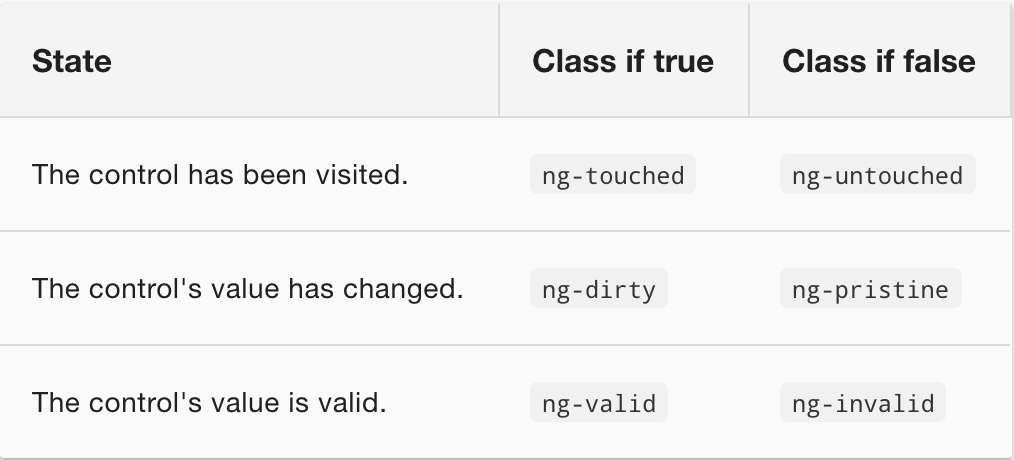
        You can use these classes to change styles based on the validity of your forms

        • The reason you use that Template reference variable (above) is because you can use it to control error messages for your user
          
                                  // your email input here...
                                  < div [hidden]="email.valid || email.pristine"
                                        class="alert alert-danger">
                                    Email is required
                                  < /div>
                                  
      5. Resetting your form: on your submit button and cancel buttons...
        
                                  (click)="submitLogin(); loginForm.reset()"
                              
    2. Reactive Forms
      1. Reactive forms are newer and are based on Observable Streams. They are amazing.
      2. Import and include ReactiveFormsModule in your app.module.ts file
        
                              import { ReactiveFormsModule } from '@angular/forms';
        
                              @NgModule({
                                imports: [
                                  // other imports ...
                                  ReactiveFormsModule
                            
      3. Import and inject the FormBuilder class in your login.component.ts
        
                              //login.component.ts
        
                              import { FormBuilder } from '@angular/forms';
                              ...
                              export class LoginComponent {
                                loginForm = this.fb.group({ 
                                  email: [],
                                  password: []
                                });
        
                                constructor(private fb: FormBuilder) { }
                              }
                            
      4. Import and use Validators class
        
                              //login.component.ts
                              import { Validators } from '@angular/forms';
                              //...
                              email: ['', Validators.required],
                              password: ['', Validators.required] 
                            });
                            
      5. In your html file, add a formControlName property and HTML5 required attribute to your inputs that matches your FormBuilder members
        
                                //login.component.html
        
                                < input name="email" formControlName="email" required />
                            
        For testing: let's add the form's status property to our view:
        
                                //login.component.html
        
                                {{loginForm.status}}
                              
      6. A list of complete Validators can be found here